An independent woodworking journalMake something worth keeping.
Good wood.
Useful knowledge.
A little patience.
The Wood Journal

Picture frame dimensions: calculate the rabbet and outside size

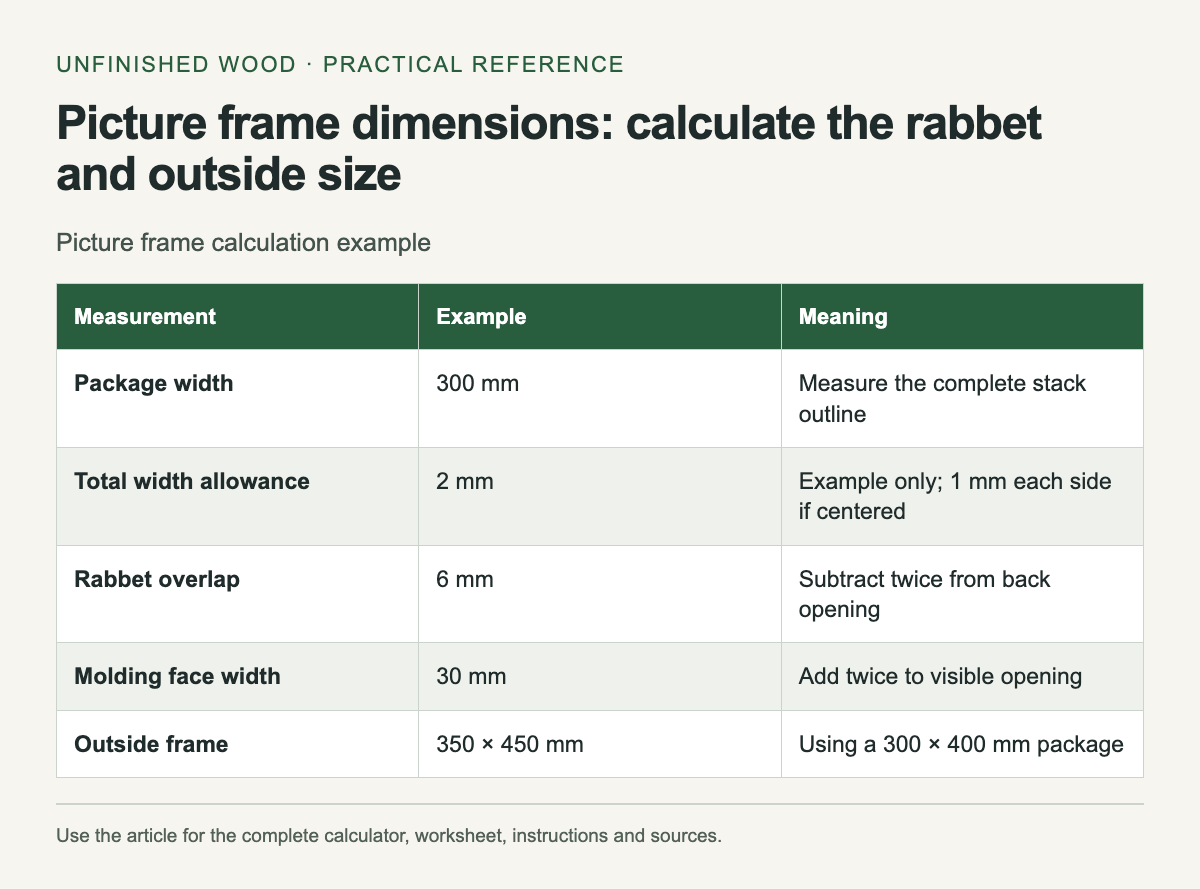
Picture frame calculation example. The complete instructions and accessible tool follow in the article.
Reference graphic from this guide. The complete instructions and tool, where available, remain in the article.

Measure the complete package that will sit inside the frame before cutting the molding. That package might include glazing, a mat, artwork and a backing board. Its outside size determines the rabbet opening at the back. The visible opening at the front is smaller because a lip overlaps the package.

Confusing those two openings can leave a carefully cut frame too small. Draw a section through one rail and name each measurement: package width, fitting allowance, rabbet overlap and molding width. Keep depth on a separate drawing. A wide rabbet is not necessarily deep enough to hold the stack.

Work from the back opening

Call the package width W, the total fitting allowance A, the rabbet overlap R and the face width of the molding M. The back opening is W + A. The visible opening is W + A − 2R. For a simple mitered frame with consistent molding, the outside width is W + A − 2R + 2M. Apply the same calculation to the height.

This is geometry, so the formula works in inches or millimeters as long as every input uses the same unit. The calculator uses millimeters. The allowance is the total added across one dimension, not an amount added at every edge. Choose it for the actual framing materials and fitting method; the example allowance is not a conservation framing specification.

A worked example

Suppose a sample package measures 300 × 400 mm. With 2 mm total allowance, 6 mm overlap and 30 mm molding, the back opening becomes 302 × 402 mm. The visible opening becomes 290 × 390 mm. The outside frame measures 350 × 450 mm. Those outside measurements correspond to the long points of simple 45-degree miters.

Draw a rectangle representing the visible opening over a copy or paper outline of the art. Check that the lip does not hide a signature or a border you wanted to show. Change the mat arrangement if necessary before committing to the molding width. A calculator cannot decide how much of an image should remain visible.

Check depth separately

Stack the actual glazing, mat and backing and measure their combined thickness. Add whatever space your chosen retainers require. Then check how much sound wood remains at the front of the rabbet. Rockler's frame guide illustrates this relationship and provides a corresponding rail-length formula. Its sample section belongs to that project; do not copy its cut depth into thinner molding.

Make a short test corner from offcuts. Fit a small piece of the package into it and check both overlap and depth. For valuable or fragile art, use appropriate conservation framing materials and advice; a woodworking dimension check does not establish that adhesives or backing are suitable.

Transfer the dimensions to the saw

Write whether your cutting dimension refers to the inside short point, the rabbet corner or the outside long point. Put that wording directly on the cut list. Mark mating rails as pairs, allow extra stock for test cuts and follow the saw manufacturer's workholding instructions for small pieces. Dry-assemble all four rails around a paper template before gluing. Measure the two diagonals and confirm the package fits without pressure.

Compare the dry frame diagonals using the same approach as the cabinet squareness check before blaming a poor fit on the rabbet dimensions.

Picture frame calculation example
MeasurementExampleMeaning
Package width300 mmMeasure the complete stack outline
Total width allowance2 mmExample only; 1 mm each side if centered
Rabbet overlap6 mmSubtract twice from back opening
Molding face width30 mmAdd twice to visible opening
Outside frame350 × 450 mmUsing a 300 × 400 mm package

Calculate your dimensions

Example: back 302 × 402 mm; visible 290 × 390 mm; outside 350 × 450 mm.

Values stay in this page. The worked example also works without JavaScript.

Related workshop guides

Sources

Illustration of unfinished wood offcuts with a combination square, caliper and pencil.
Workshop illustration. Use your own measured dimensions for the worksheet.
Workshop reference

Unfinished Wood editorial team

Practical guides to materials, tools and finishes. Follow the cited sources and the instructions for your own tools and products.

Comments

Popular posts from this blog

Lumber Grades At A Glance

Illustrative AI-generated image. Domestic hardwood lumber found at sawmills meets different quality levels or grades as specified by the National Hardwood Lumber Association (NHLA). The basis for this wood grading is the number and size of defect-free clear cuttings in a board, as summarized below, Thickness is not a consideration, though with some species worm holes, gum pockets, and stain are acceptable. FAS (First & Seconds) lumber grade. This premium grade represents the finest lumber yield in a log. Generally, the minimum size board is 6" wide by 8' long which yields a minimum of 83 1/3% clear cuttings on its poorest face. F1F (FAS One Face) lumber grade. The best face grades as clear FAS; the worst, as #1 common, containing some knots. Selects lumber grade. Close to a FAS board. A Select board must be a minimum of 4" wide and 6' long and yield a minimum of 83 1/3% clear cuttings, but only on one face with #1 common on the worst face. #...

4-Step Antique Finish

Create a fool-the-eye timeworn look. Some projects, like wine server for your wood cabinet, are not unlike a pair of blue jeans, Both look better after a few years of regular use. To create that well-worn look wood finish, I have come up with a finishing schedule that can add a century's worth of character in less time than it would take to stonewash a new pair of Levis. At first glance, this four-step finish might appear demanding, bur keep reading. As you'll soon learn, this special finish amounts to little more than a combination of a few basic techniques you've probably used before. The “pickling" and - “highlighting” I use aren't much different than whitewashing a fence. Simply brush on the color and then wipe some off until it looks good to you. And after each step you'll apply a quick-drying seal coat to save your work. Besides providing an additional decorative element to your work, antiquing has some practical advantages. Adding color to t...

How to buy Sawmill Hardwood and Save (Part 1)

Illustrative AI-generated image. When you visit a home center to purchase hardwood lumber, more than likely you'll encounter limited quantities, limited species, and through-the-roof pricing. In some cases, you're paying for that shiny cellophane wrapper. Before you sell your tools and steer toward a different hobby, you need to check out the benefits of shopping at a lumber sawmill. While some mills service only the commercial building industry. make pallets, or ship woods overseas, many gladly sell to the local woodworker. Here is where you'll find great variety and huge savings. If the special lingo and ways in which sawmills sell hardwood have kept you at bay, let us help you shop like a pro. First things first: finding a sawmill. While your local yellow pages will yield results when you look under "Sawmills” or “Lumber-Retail," members of 10 cal woodworking clubs, woodworking friends, or woodworking specialty stores may serve as better sources for locati...

It starts with
a piece of wood.

Unfinished Wood is a collection of practical ideas for the workshop: choosing your materials, solving small problems, and bringing out the character in what you make.

Unfinished Wood editorial team

Workshop reference guides organized around the decisions you make before and during a project.

Tools & workshop practice

Plan the work

Guides to hand tools, joinery, jigs and project preparation.

Wood & materials

Choose your materials

Reference guides to lumber, grain, dimensions and wood movement.

Surface & finish

Prepare the surface

Guides to sanding, sample boards, color and finish selection.

Search This Blog